

什么是 Dify?
Dify是一个用于构建AI工作流的开源平台。通过在可视化画布上编排AI模型、连接数据源、定义处理流程,直接将你的领域知识转化为可运行的软件。Waiting for api.github.com...本文将向你介绍如何使用
Docker在您的Windows设备上部署Dify。
TIP本文 100% 由人类编写
安装Docker
CAUTIONDocker 官网为https://www.docker.com,其他号称 “Docker官方网站” 的网站一律为假!!!由于受不可抗力影响,Docker 网站目前访问受阻,导致从Docker Hub拉取镜像往往出现
速度慢、拉取超时等问题,但是您可以使用诸如Steamcommunity 302(下载链接)等工具加速访问
访问https://www.docker.com下载Docker Desktop Installer.exe可执行文件(当然,Docker Desktop 也在微软商店提供安装,但我未验证这种安装方法是否可以更改安装位置)
更改安装位置
由于Docker Desktop默认安装在 C 盘(C:\Program Files\Docker\Docker),我们可以通过命令行将Docker Desktop安装到指定目录(在文件所在的目录启动终端)
.\'Docker Desktop Installer.exe' install --installation-dir="D:\Docker"这将使Docker Desktop安装到D:\Docker,需要提前在D盘根目录下创建名为Docker的文件夹,否则命令会执行失败
安装时选择默认选项即可,安装完成后重启电脑,这会启用WSL(适用于 Linux 的 Windows 子系统)
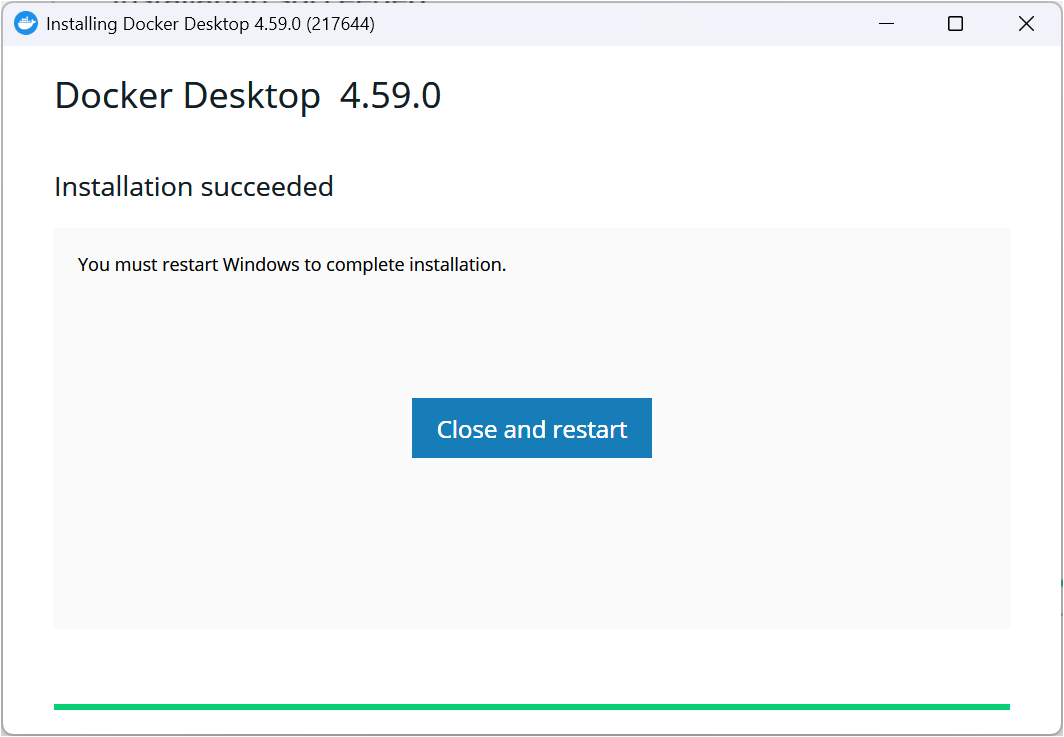
电脑重启后会弹出以下弹窗,请根据提示升级WSL版本,此操作需要良好的网络连接
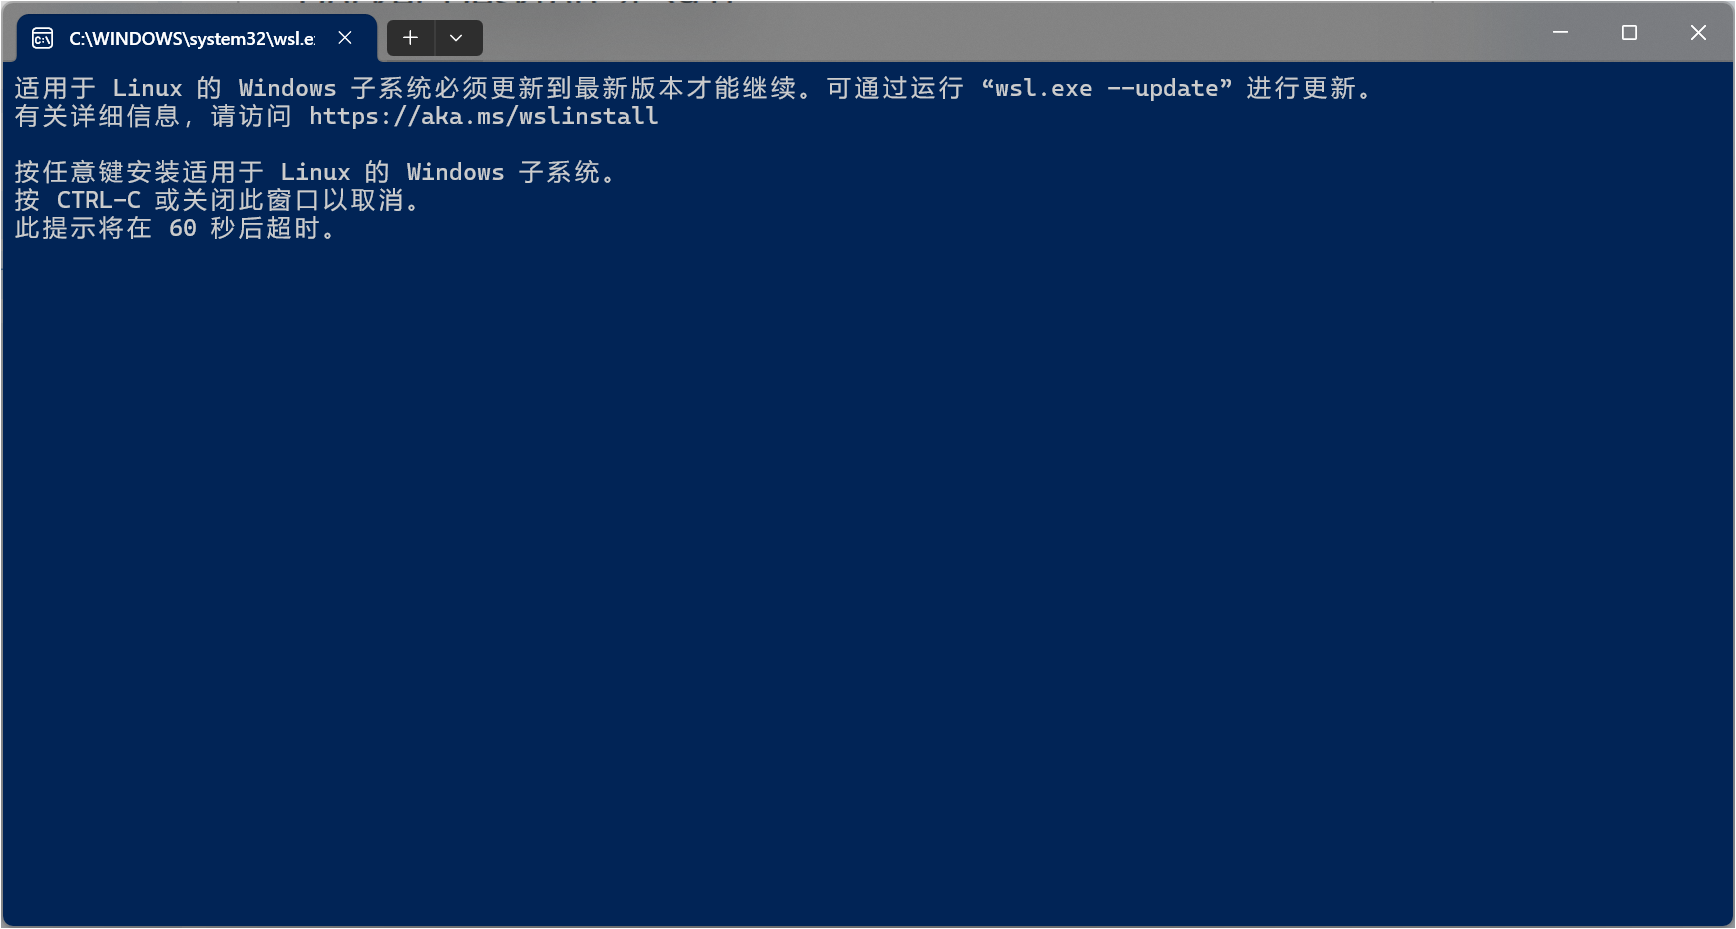
如果你不慎关闭此窗口,请以管理员身份运行终端并执行以下命令:
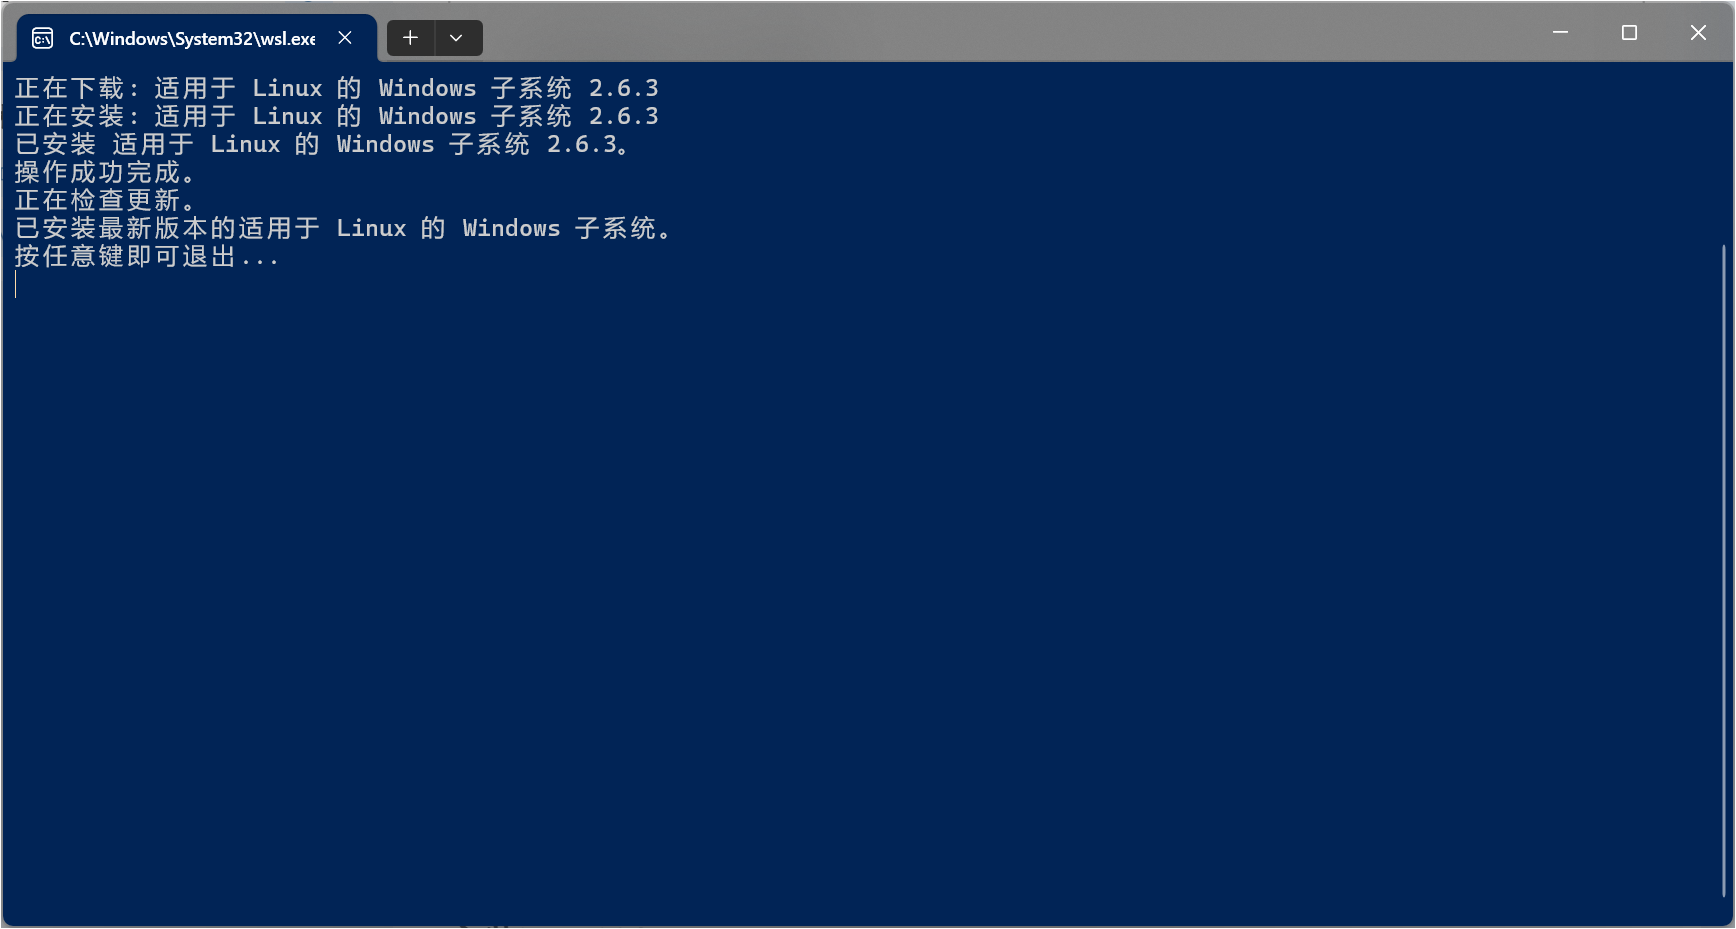
wsl.exe --update当终端输出类似以下内容时,你可以安全地关闭终端:
启动Docker Desktop并跳过登录

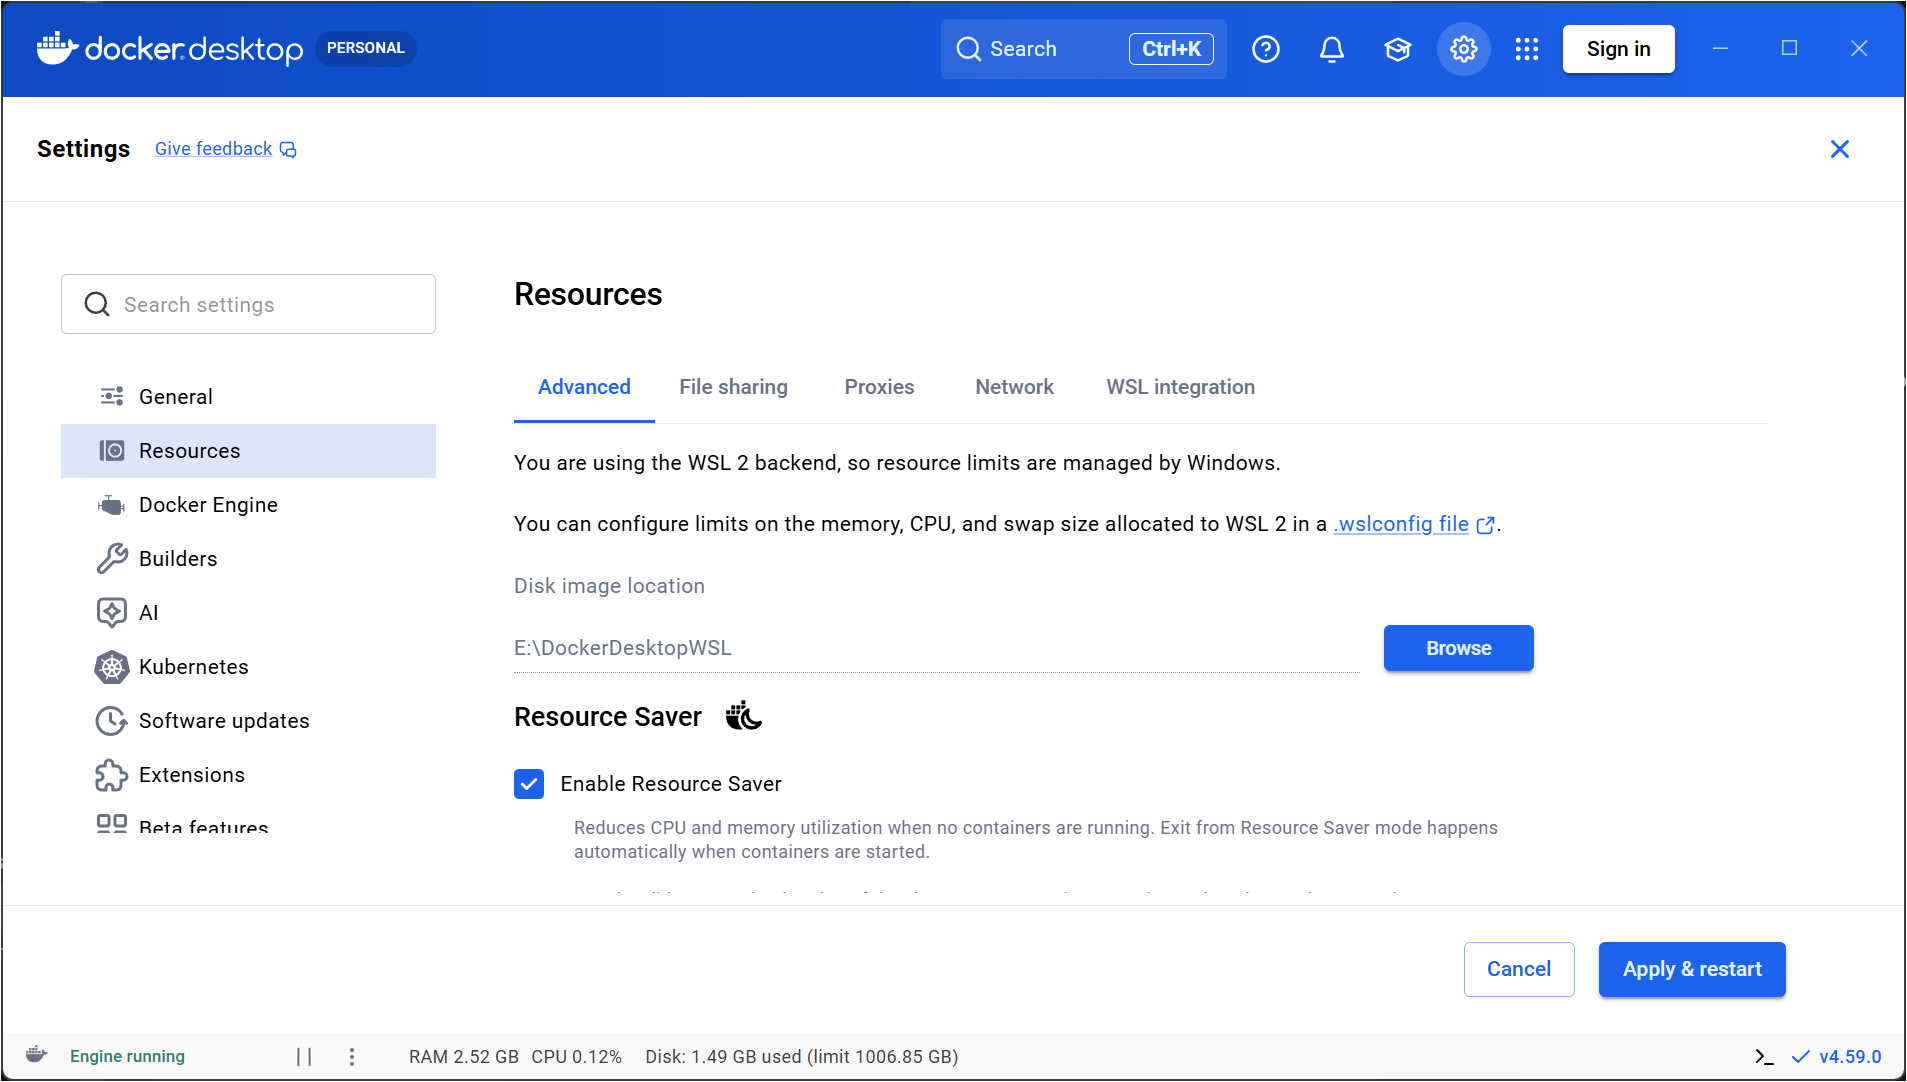
更改默认镜像保存位置
Docker 的镜像默认安装在%UserProfile%\AppData\Local\Docker\wsl目录下,建议将目录更改到除 C 盘外的其他位置,Docker 会自动在选定的目录下增加子DockerDesktopWSL文件夹
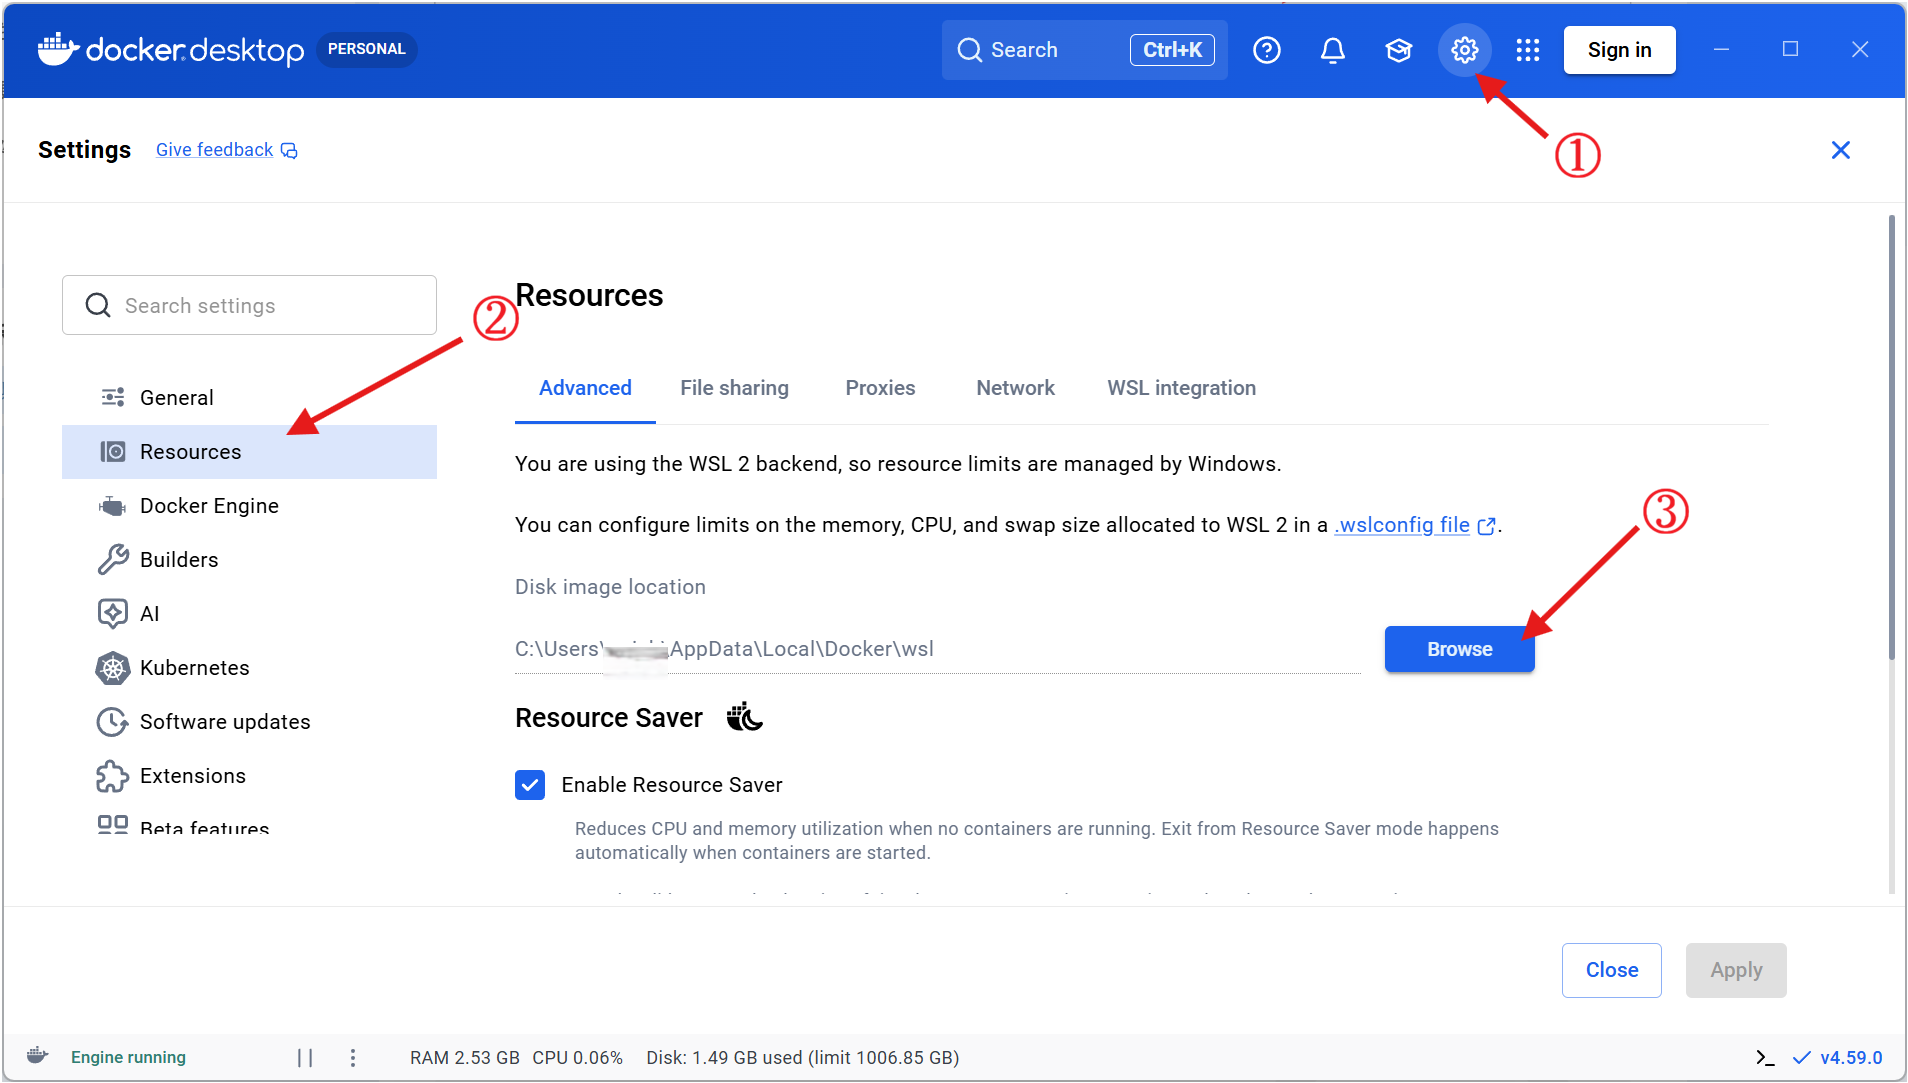
点击Apply & restart保存设置
部署 Dify
Dify Docs
硬件要求您的设备需要具备
两个以上核心的CPU(中央处理器)以及4 GiB以上RAM(随机存储器,即“内存”)
克隆 Dify
官方文档是这么写的:
git clone --branch "$(curl -s https://api.github.com/repos/langgenius/dify/releases/latest | jq -r .tag_name)" https://github.com/langgenius/dify.git其中"$()"这部分的作用是自动获取Dify最新Release的标签(tag),需要额外安装一个jq,这里我们直接访问Dify的GitHub Release页面,手动复制一下最新的tag。例如截至2026-05-10的最新版是1.14.0,我们将上述命令改成如下形式:
git clone --branch 1.14.0 https://github.com/langgenius/dify.git示例输出:
PS E:\Develop\Github> git clone --branch 1.14.0 https://github.com/langgenius/dify.gitCloning into 'dify'...remote: Enumerating objects: 404526, done.remote: Counting objects: 100% (438/438), done.remote: Compressing objects: 100% (306/306), done.remote: Total 404526 (delta 238), reused 132 (delta 132), pack-reused 404088 (from 4)Receiving objects: 100% (404526/404526), 353.61 MiB | 10.69 MiB/s, done.Resolving deltas: 100% (296297/296297), done.Note: switching to '6fafeec41502152ec3552d1851aaeb3c22db1f02'.
You are in 'detached HEAD' state. You can look around, make experimentalchanges and commit them, and you can discard any commits you make in thisstate without impacting any branches by switching back to a branch.
If you want to create a new branch to retain commits you create, you maydo so (now or later) by using -c with the switch command. Example:
git switch -c <new-branch-name>
Or undo this operation with:
git switch -
Turn off this advice by setting config variable advice.detachedHead to false
Updating files: 100% (11297/11297), done.启动 Dify
- 导航到
Dify源代码中的docker目录:
cd dify/docker- 复制示例环境配置文件:
cp .env.example .env- 根据你的 Docker Compose 版本选择相应命令启动容器:
docker compose up -d这一步需要拉取的文件较多,请耐心等待。你应该会看到类似以下的输出,显示每个容器的状态和启动时间:
PS E:\Develop\Github\dify\docker> docker compose up -d[+] up 19/23 ✔ Image langgenius/dify-api:1.14.0 Pulled 15.3s ✔ Image langgenius/dify-plugin-daemon:0.6.0-local Pulled 50.7s ✔ Network docker_default Created 0.2s ✔ Network docker_ssrf_proxy_network Created 0.1s ✔ Container docker-sandbox-1 Started 3.1s ✔ Container docker-init_permissions-1 Exited 3.6s ✔ Container docker-redis-1 Started 3.1s ✔ Container docker-db_postgres-1 Healthy 25.1s ✔ Container docker-web-1 Started 3.1s ✔ Container docker-ssrf_proxy-1 Started 3.2s ✔ Container docker-weaviate-1 Started 3.1s ✔ Container docker-plugin_daemon-1 Started 25.1s ✔ Container docker-api-1 Started 24.8s ✔ Container docker-worker_beat-1 Started 24.8s ✔ Container docker-worker-1 Started 24.8s ✔ Container docker-nginx-1 Started 24.8s
What's next: Filter, search, and stream logs from all your Compose services in one place with Docker Desktop's Logs view. docker-desktop://dashboard/logs- 验证所有容器是否成功运行:
docker compose ps示例输出,每个容器的状态应为Up或healthy:
PS E:\Develop\Github\dify\docker> docker compose psNAME IMAGE COMMAND SERVICE CREATED STATUS PORTSdocker-api-1 langgenius/dify-api:1.14.0 "/bin/bash /entrypoi…" api About a minute ago Up About a minute (healthy) 5001/tcpdocker-db_postgres-1 postgres:15-alpine "docker-entrypoint.s…" db_postgres 2 minutes ago Up About a minute (healthy) 5432/tcpdocker-nginx-1 nginx:latest "sh -c 'cp /docker-e…" nginx About a minute ago Up About a minute 0.0.0.0:80->80/tcp, [::]:80->80/tcp, 0.0.0.0:443->443/tcp, [::]:443->443/tcpdocker-plugin_daemon-1 langgenius/dify-plugin-daemon:0.6.0-local "/usr/bin/tini -g --…" plugin_daemon About a minute ago Up About a minute 0.0.0.0:5003->5003/tcp, [::]:5003->5003/tcpdocker-redis-1 redis:6-alpine "docker-entrypoint.s…" redis 2 minutes ago Up About a minute (healthy) 6379/tcpdocker-sandbox-1 langgenius/dify-sandbox:0.2.15 "/entrypoint.sh" sandbox 2 minutes ago Up About a minute (healthy)docker-ssrf_proxy-1 ubuntu/squid:latest "sh -c 'cp /docker-e…" ssrf_proxy 2 minutes ago Up About a minute 3128/tcpdocker-weaviate-1 semitechnologies/weaviate:1.27.0 "/bin/weaviate --hos…" weaviate 2 minutes ago Up About a minutedocker-web-1 langgenius/dify-web:1.14.0 "/bin/sh ./entrypoin…" web 2 minutes ago Up About a minute 3000/tcpdocker-worker-1 langgenius/dify-api:1.14.0 "/bin/bash /entrypoi…" worker About a minute ago Up About a minute 5001/tcpdocker-worker_beat-1 langgenius/dify-api:1.14.0 "/bin/bash /entrypoi…" worker_beat About a minute ago Up About a minute 5001/tcp访问
- 打开管理员初始化页面以设置管理员账户:
http://localhost/install你将看到:
- 完成管理员账户设置后,在以下地址登录
Dify:
http://localhostTIP关于
Dify其余的配置、升级等其他信息请参考Dify Docs
使用 Dify
配置模型
点击右上角的头像,打开设置
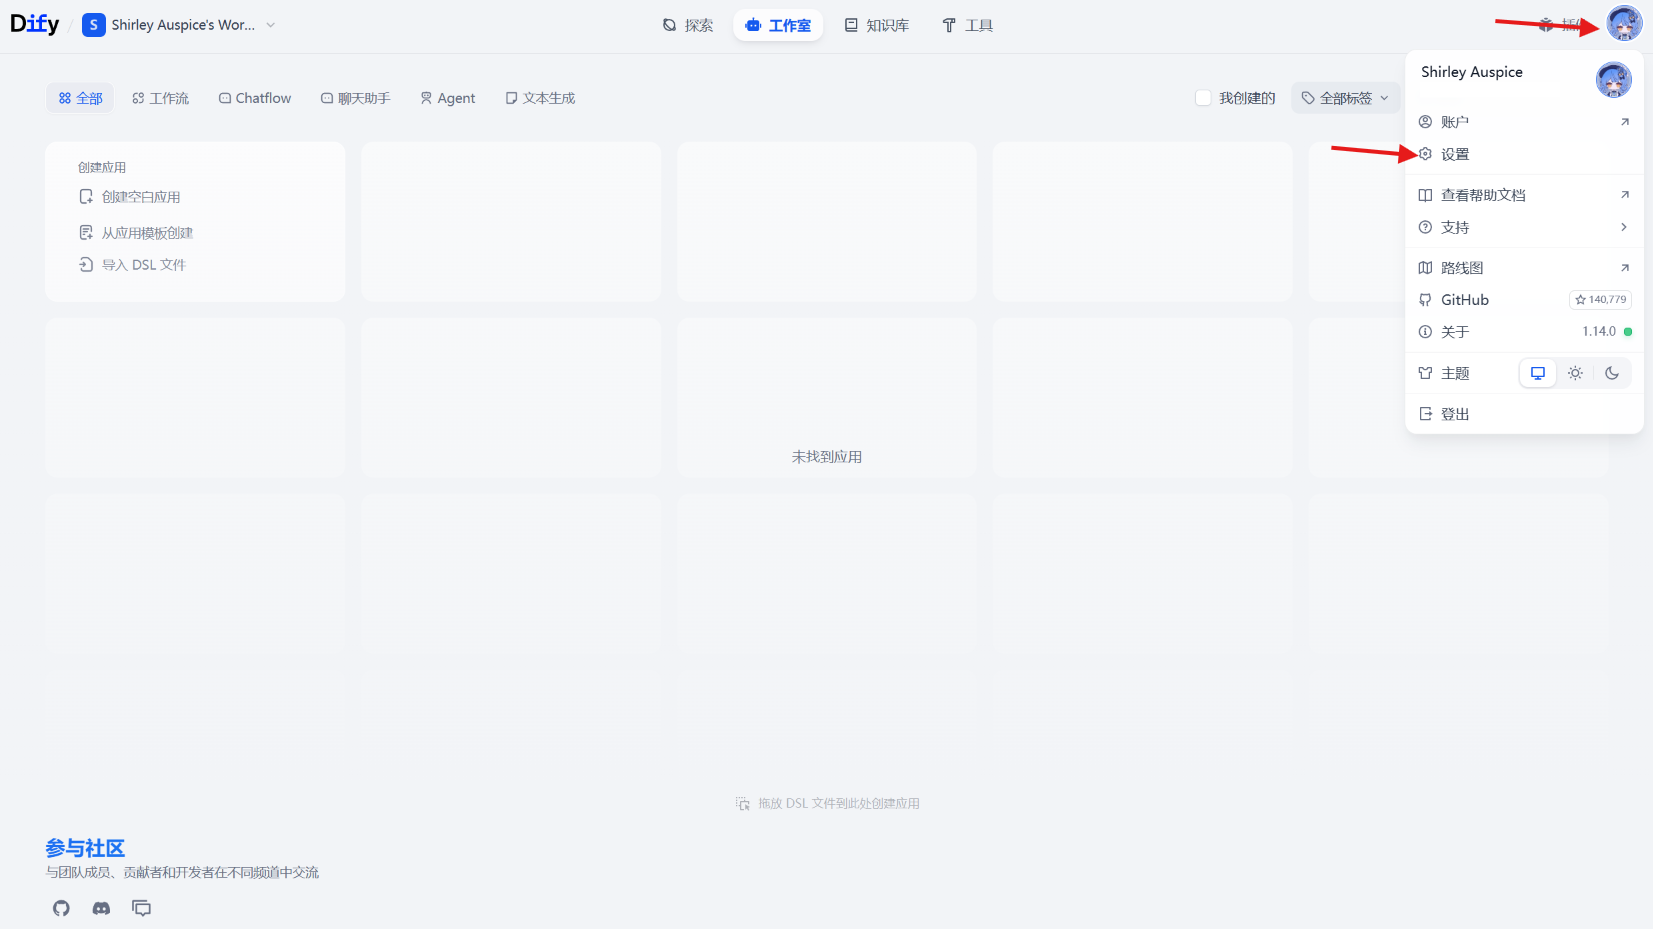
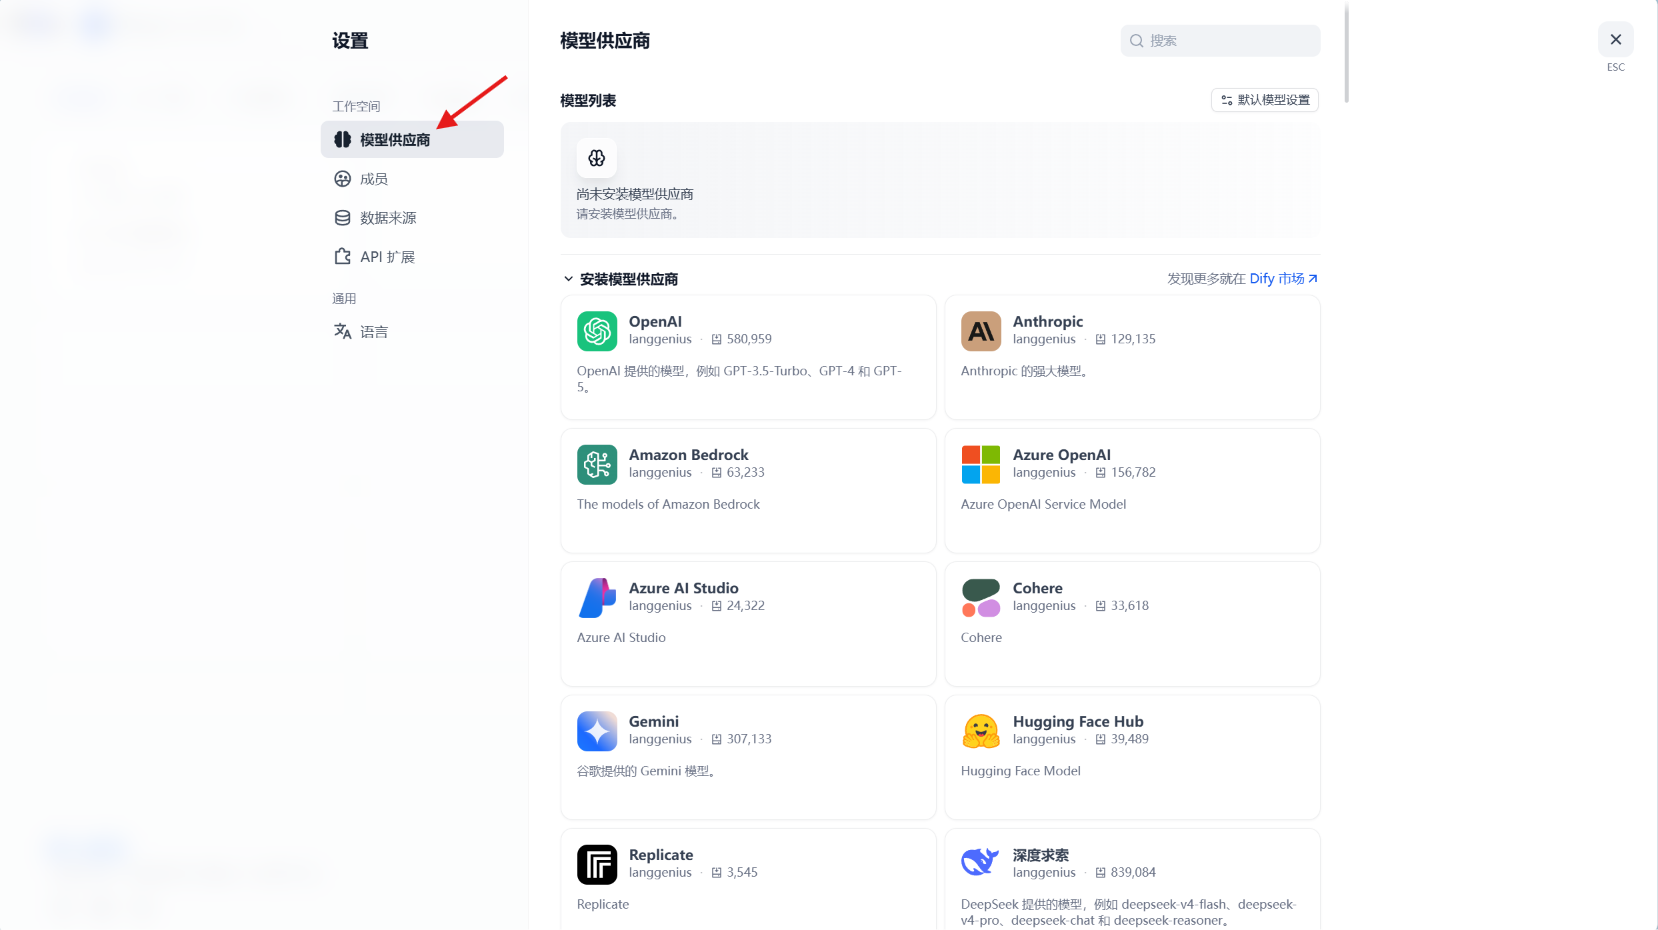
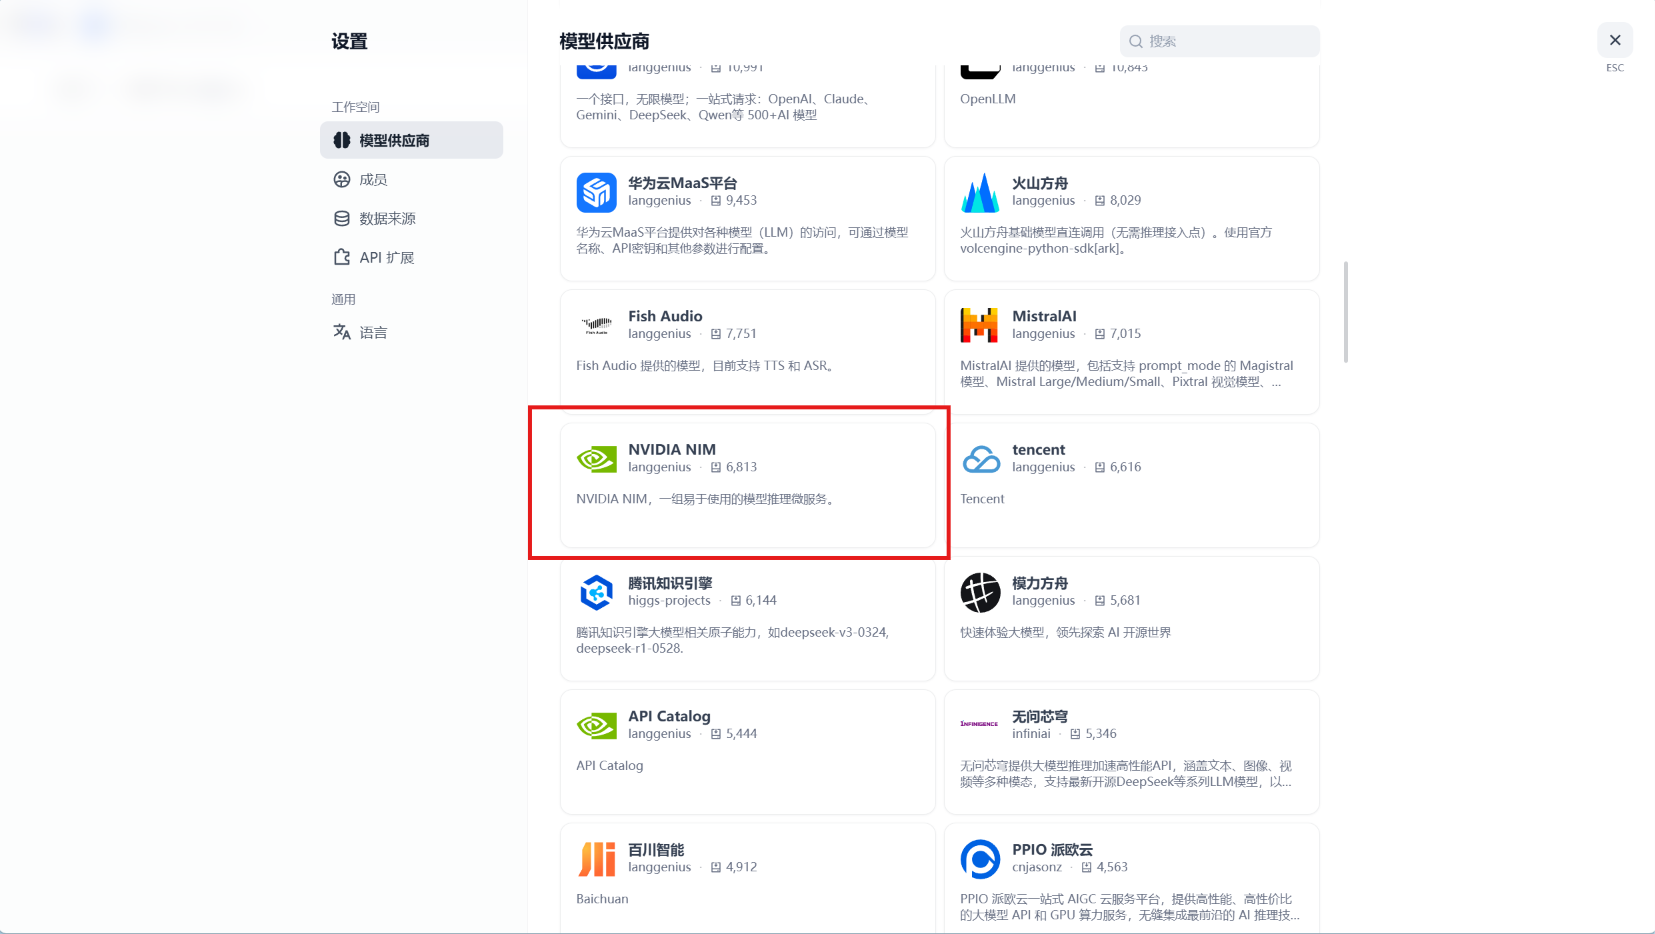
打开模型供应商页面
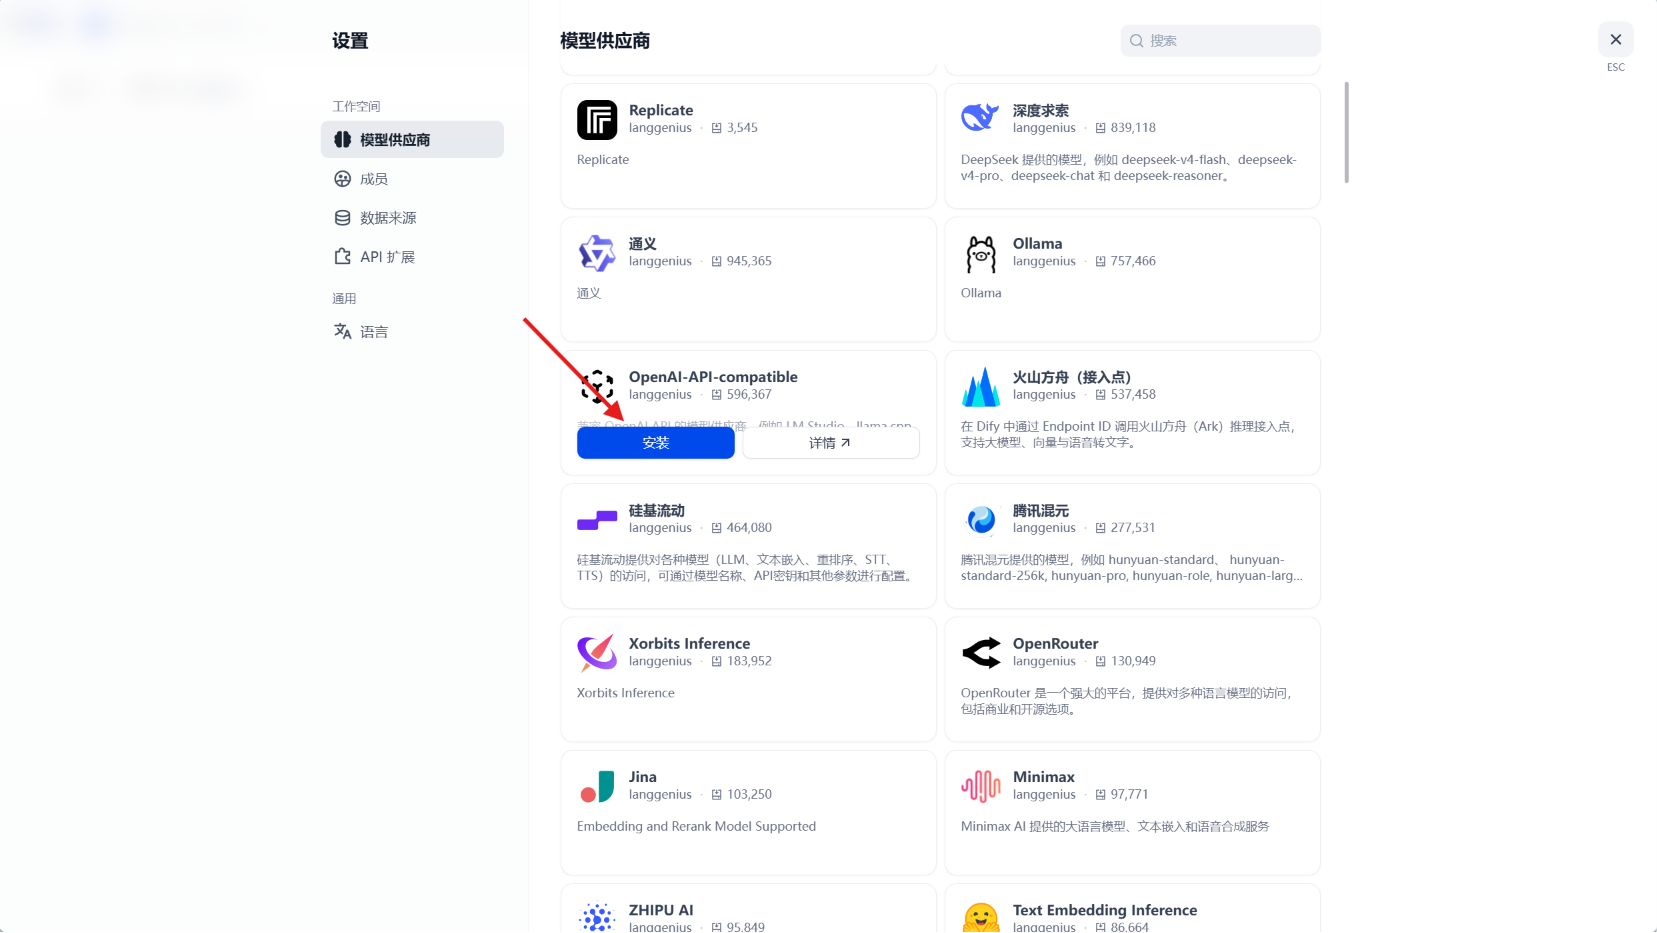
这里我们以免费的NVIDIA NIM APIs为例,点击安装:
NOTE没有
NVIDIA NIM API Key?自行访问Try NVIDIA NIM APIs注册一个NVIDIA账号并获取一个以nvapi-开头的API Key
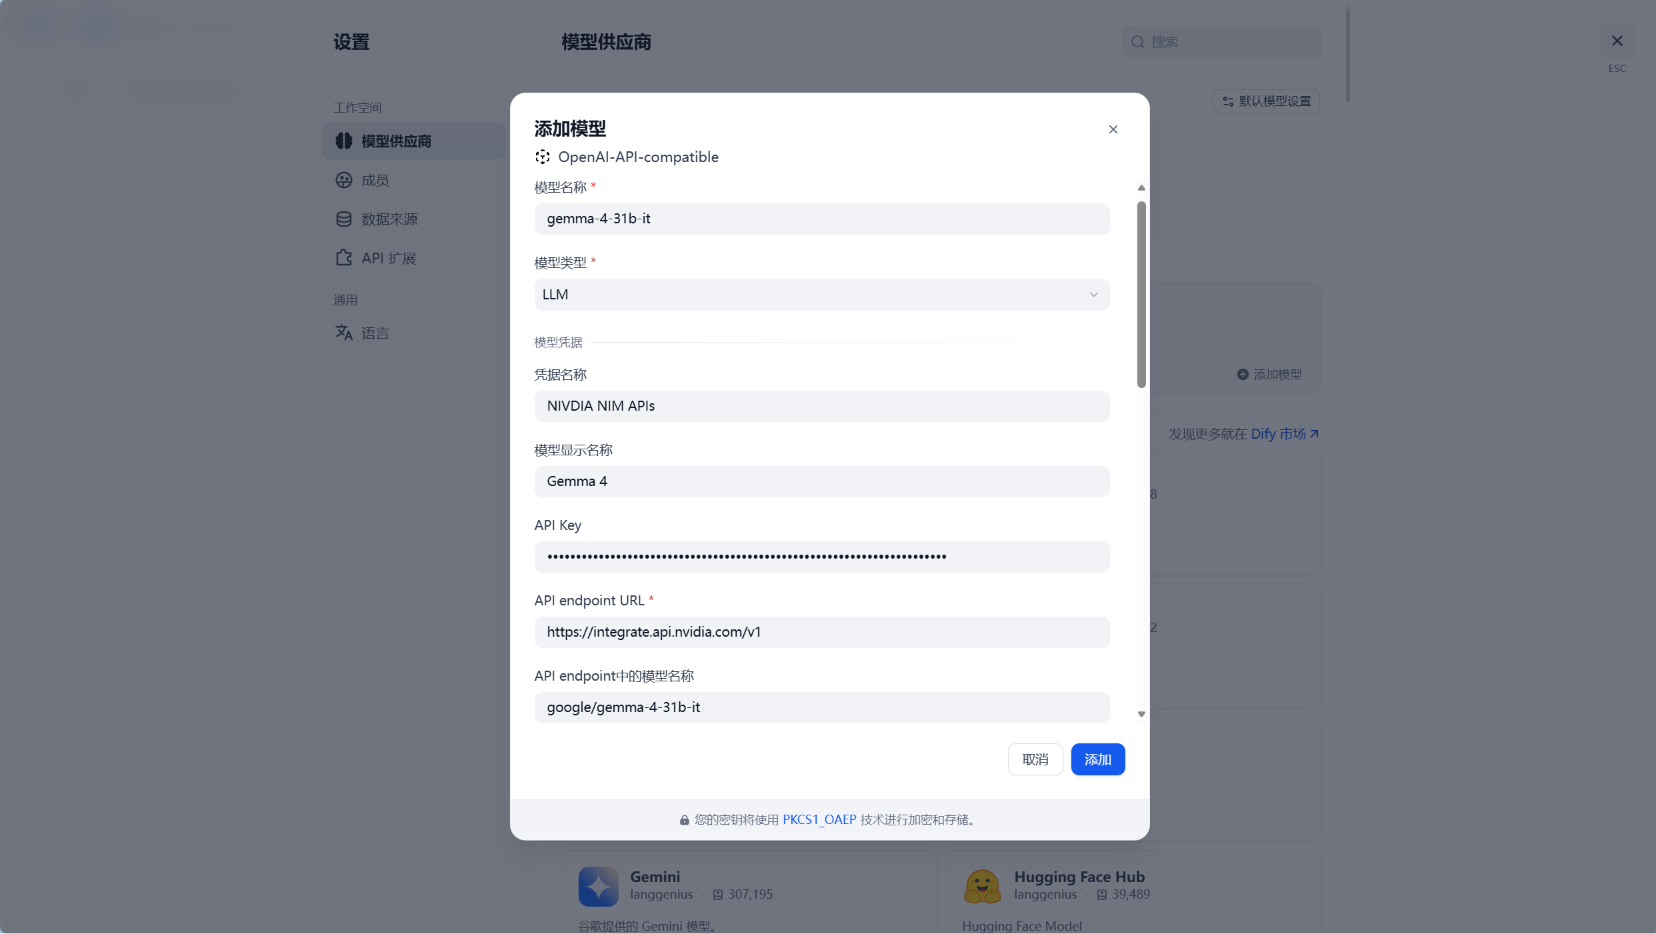
点击添加模型
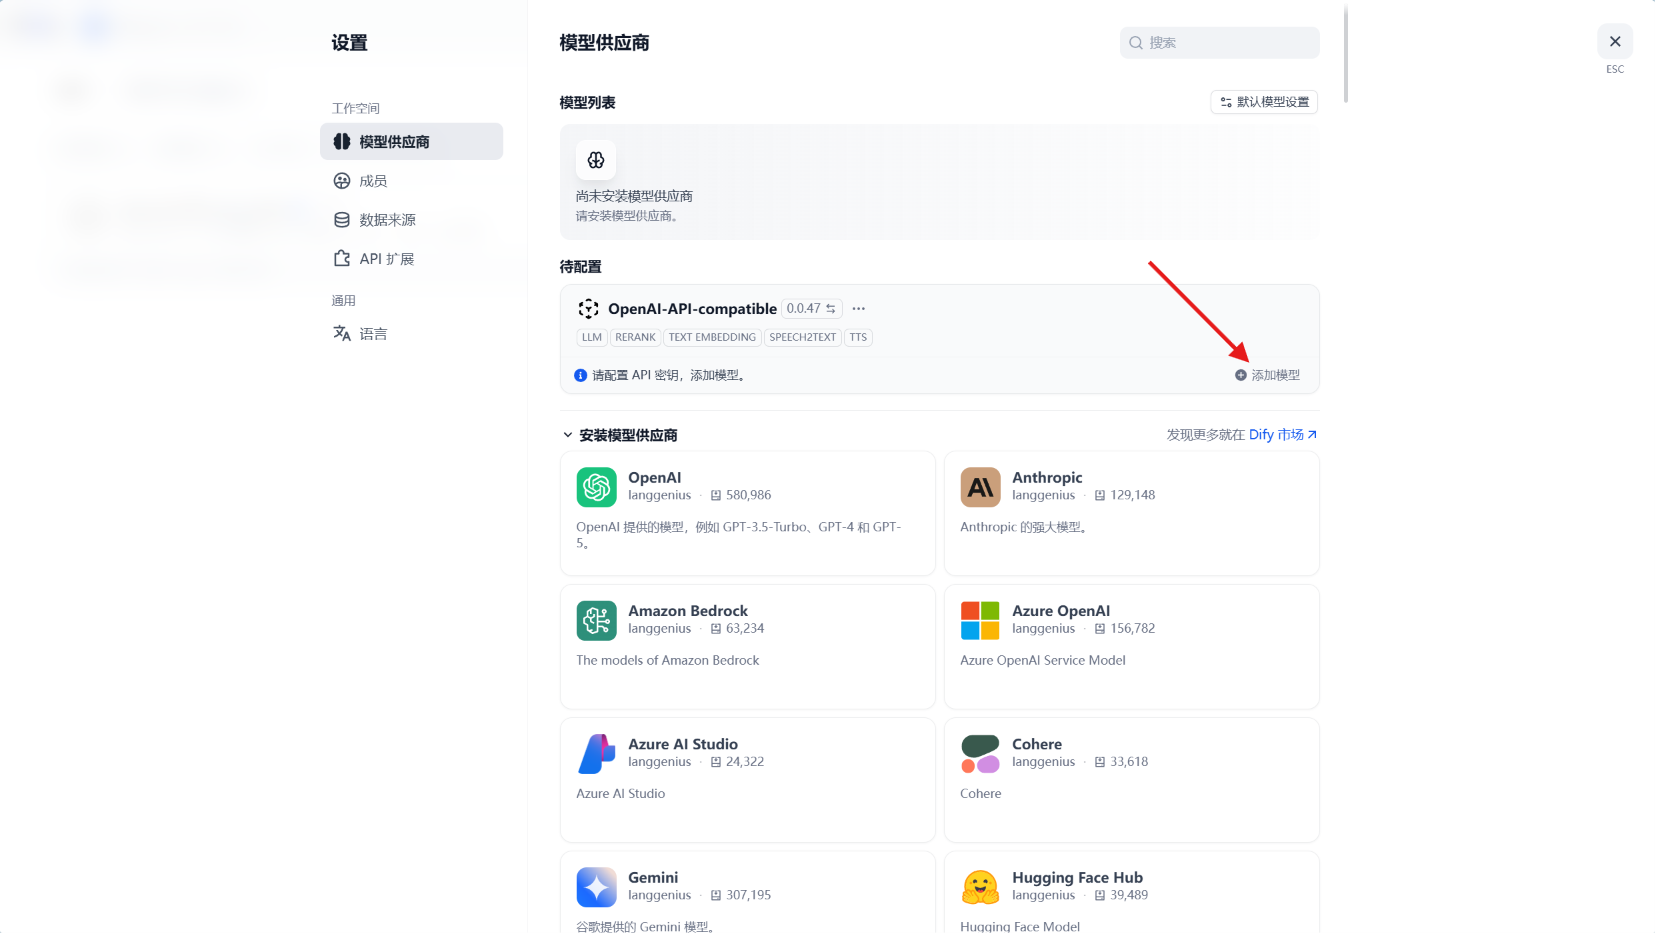
这里我们以Google的Gemma 4模型为例:在API Key填入您的NVIDIA NIM API Key,在API endpoint中的模型名称填入google/gemma-4-31b-it,在API endpoint URL填入https://integrate.api.nvidia.com/v1,其他的自行配置:
TIP模型名称需要您在Models - Try NVIDIA NIM APIs页面自行复制(模型链接
https://build.nvidia.com/google/gemma-4-31b-it去掉https://build.nvidia.com/)模型名称 API endpoint URL
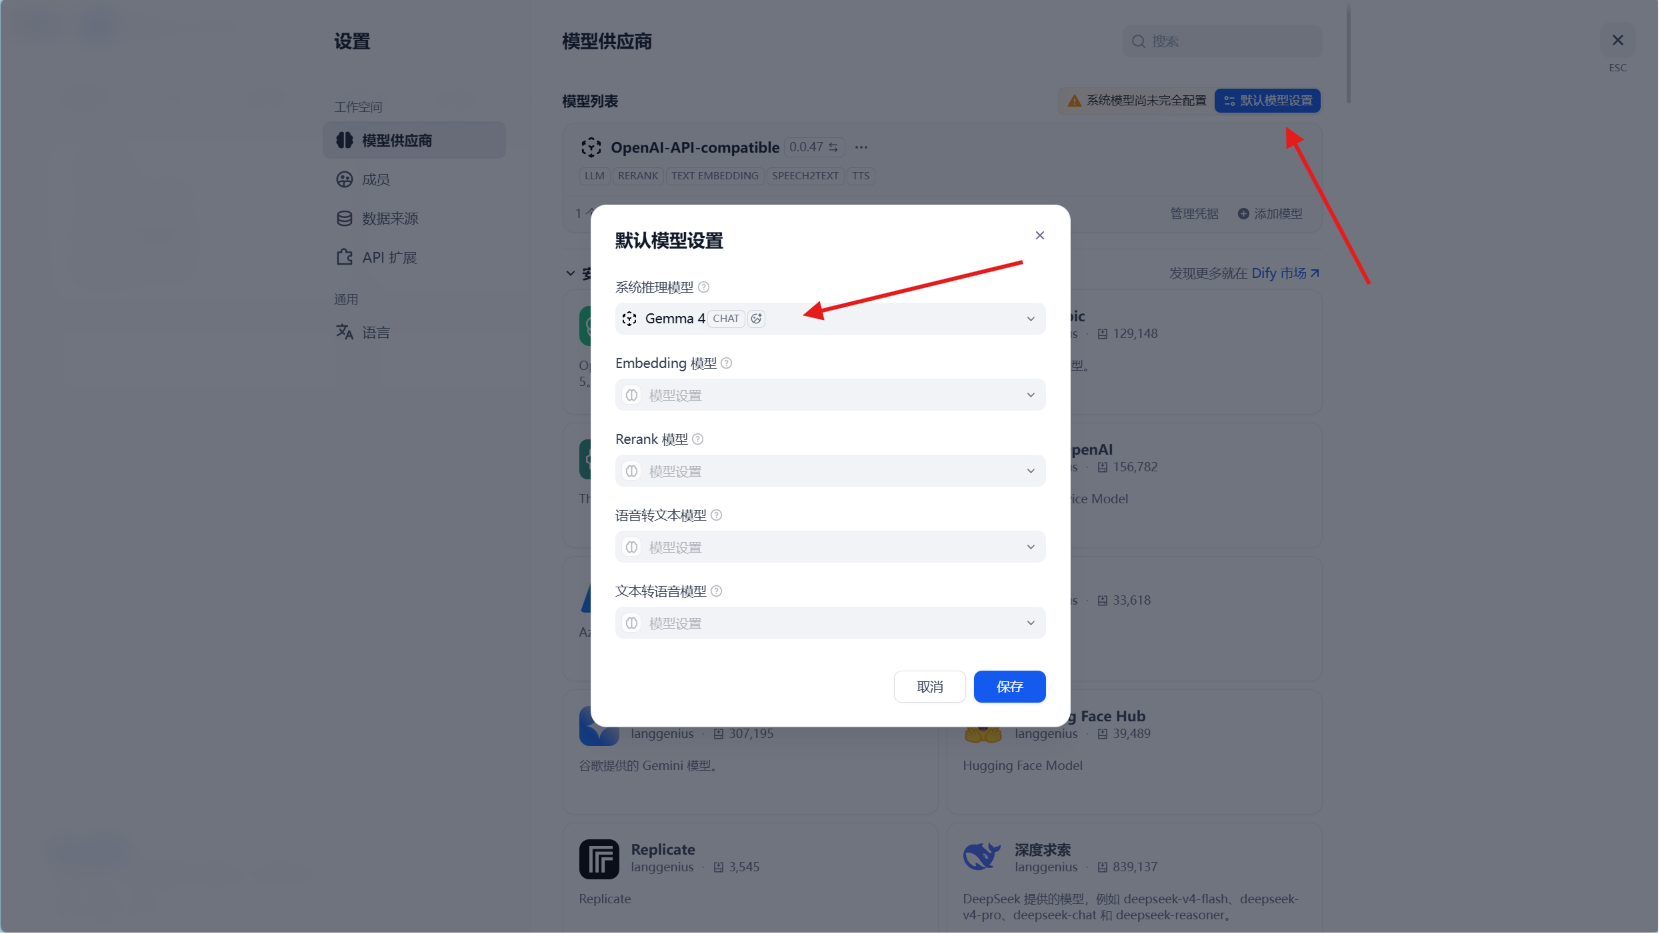
更改默认模型设置,其余的我们稍后再配置:
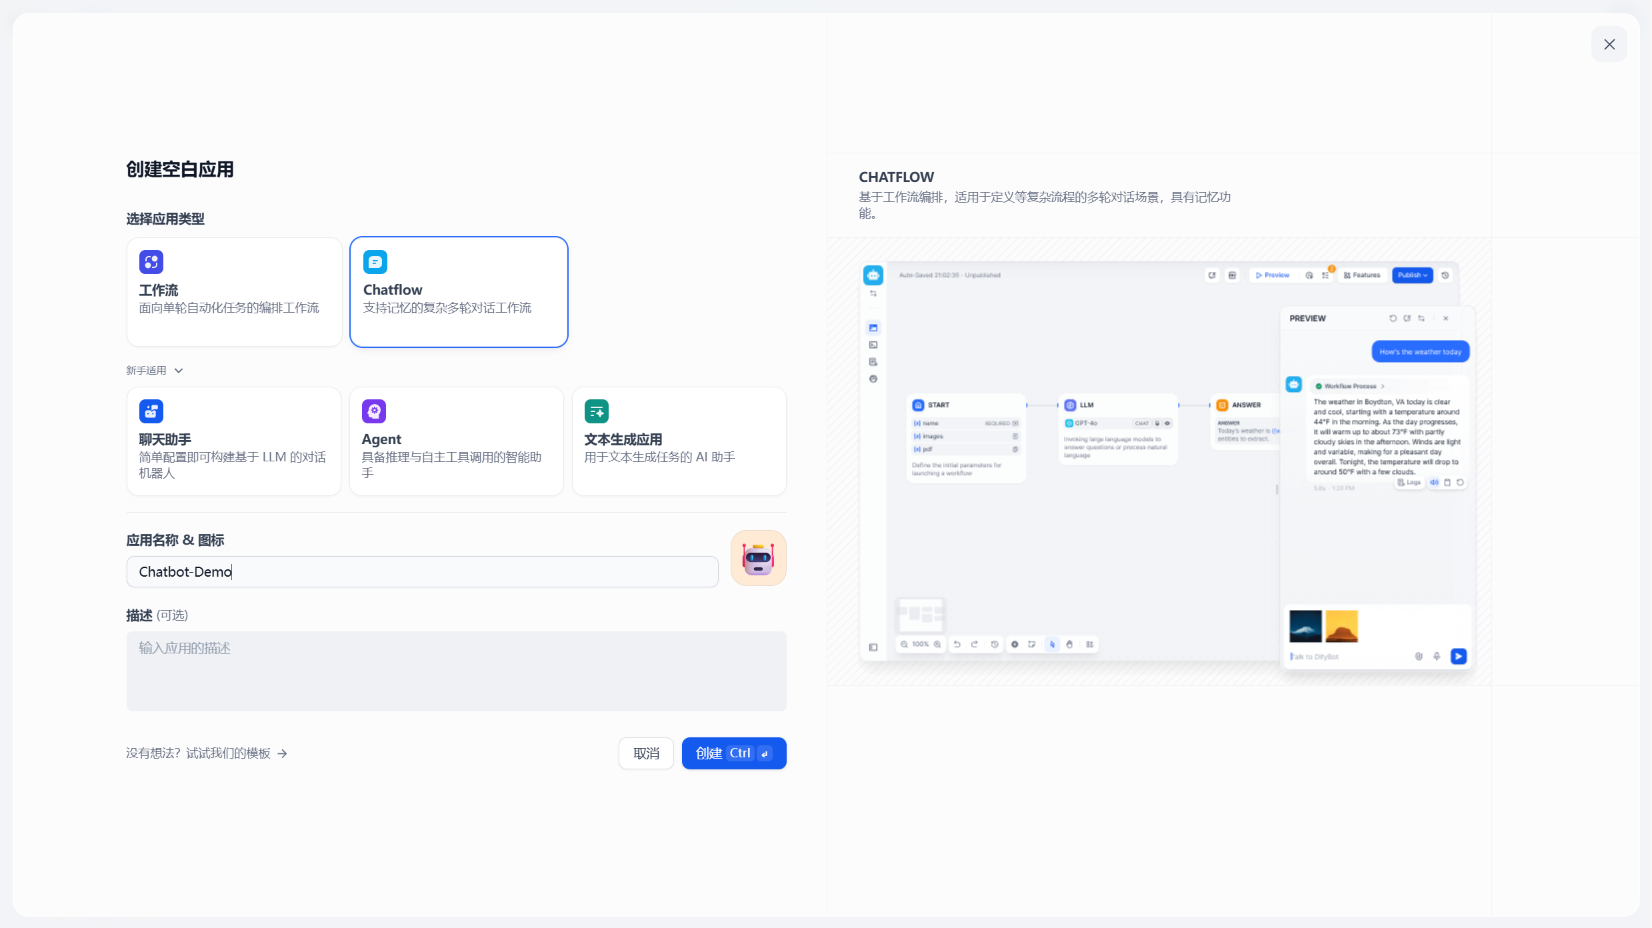
创建工作流
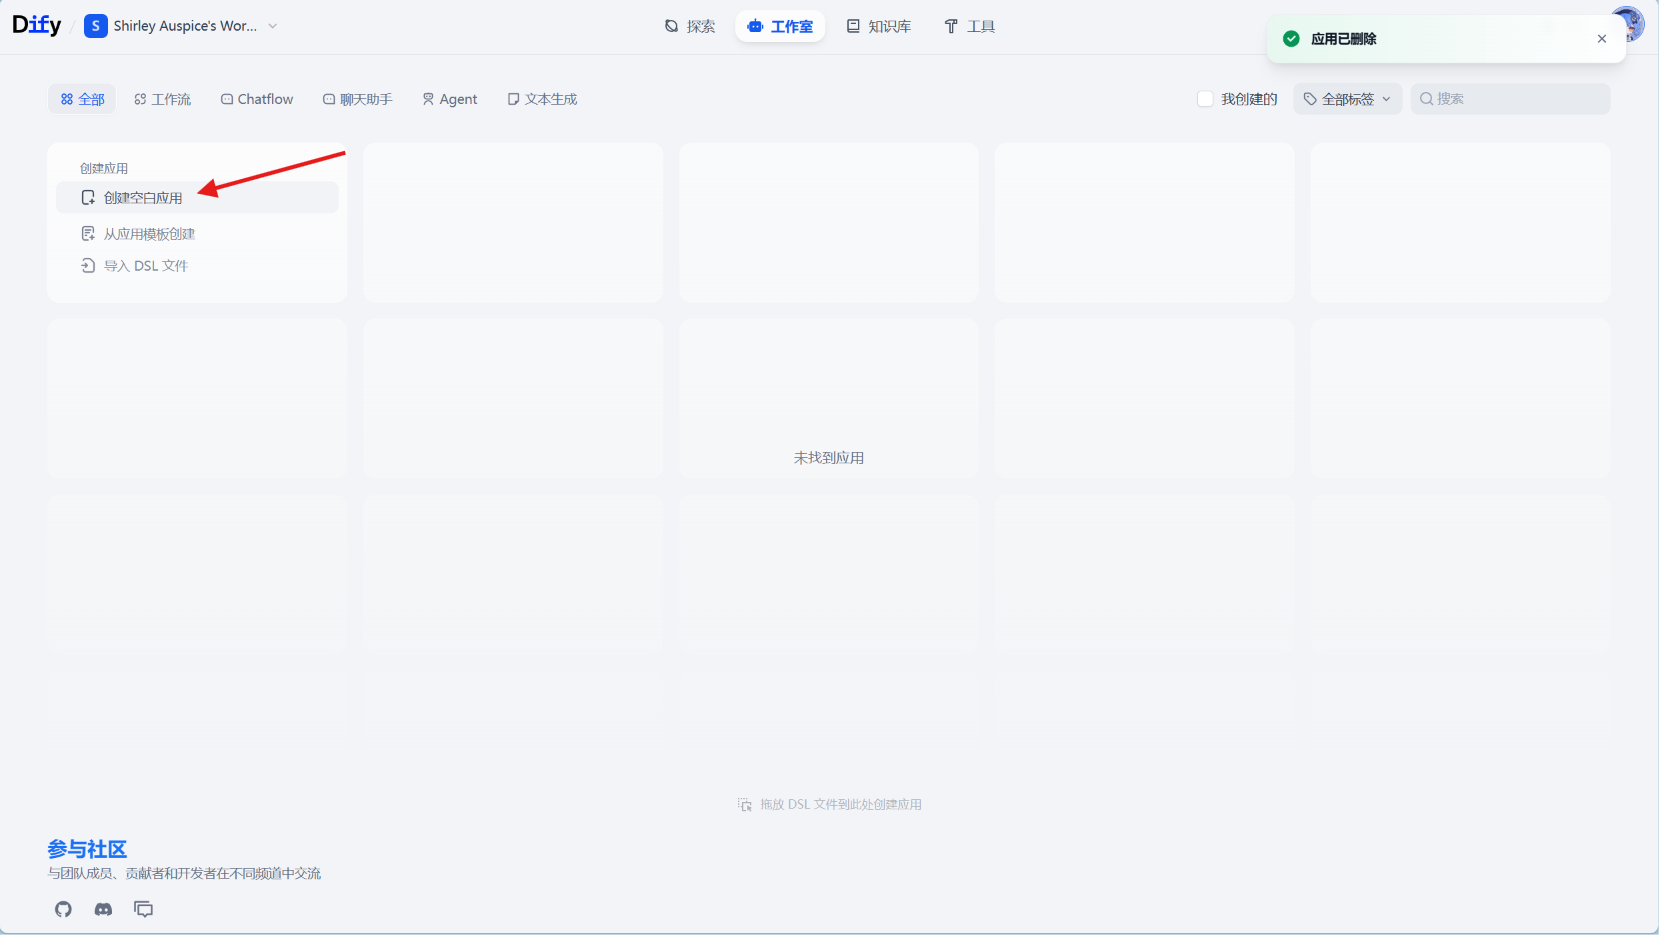
回到首页,您可以创建空白应用也可以从应用模板创建
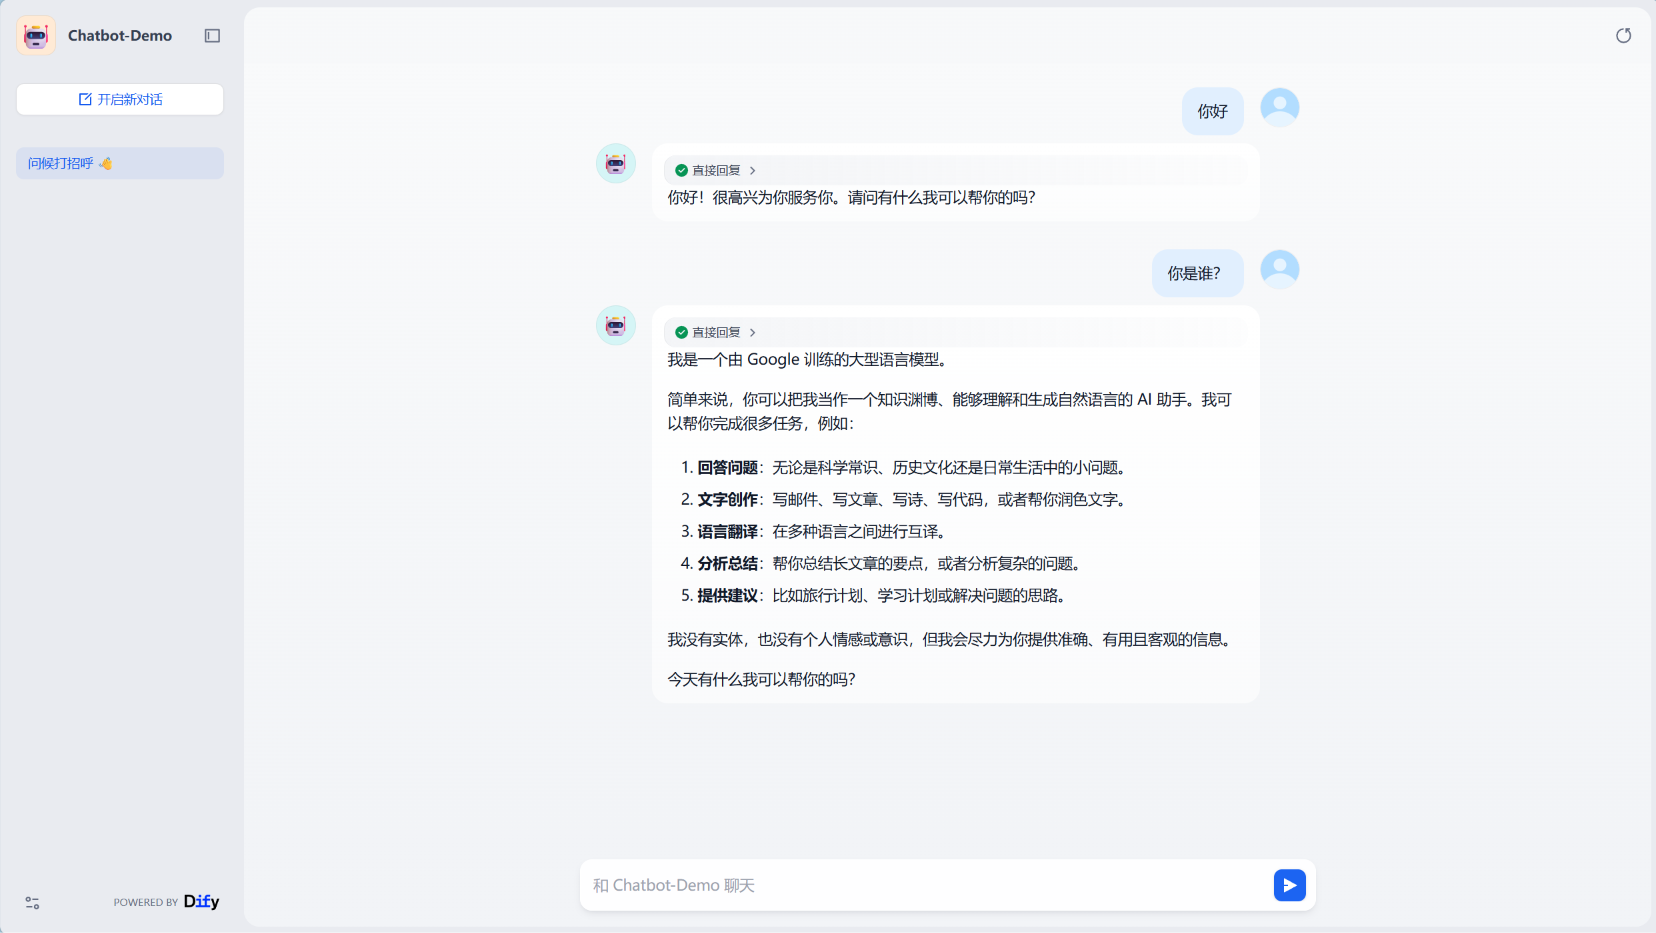
我们这里自己创建一个简单的聊天机器人:
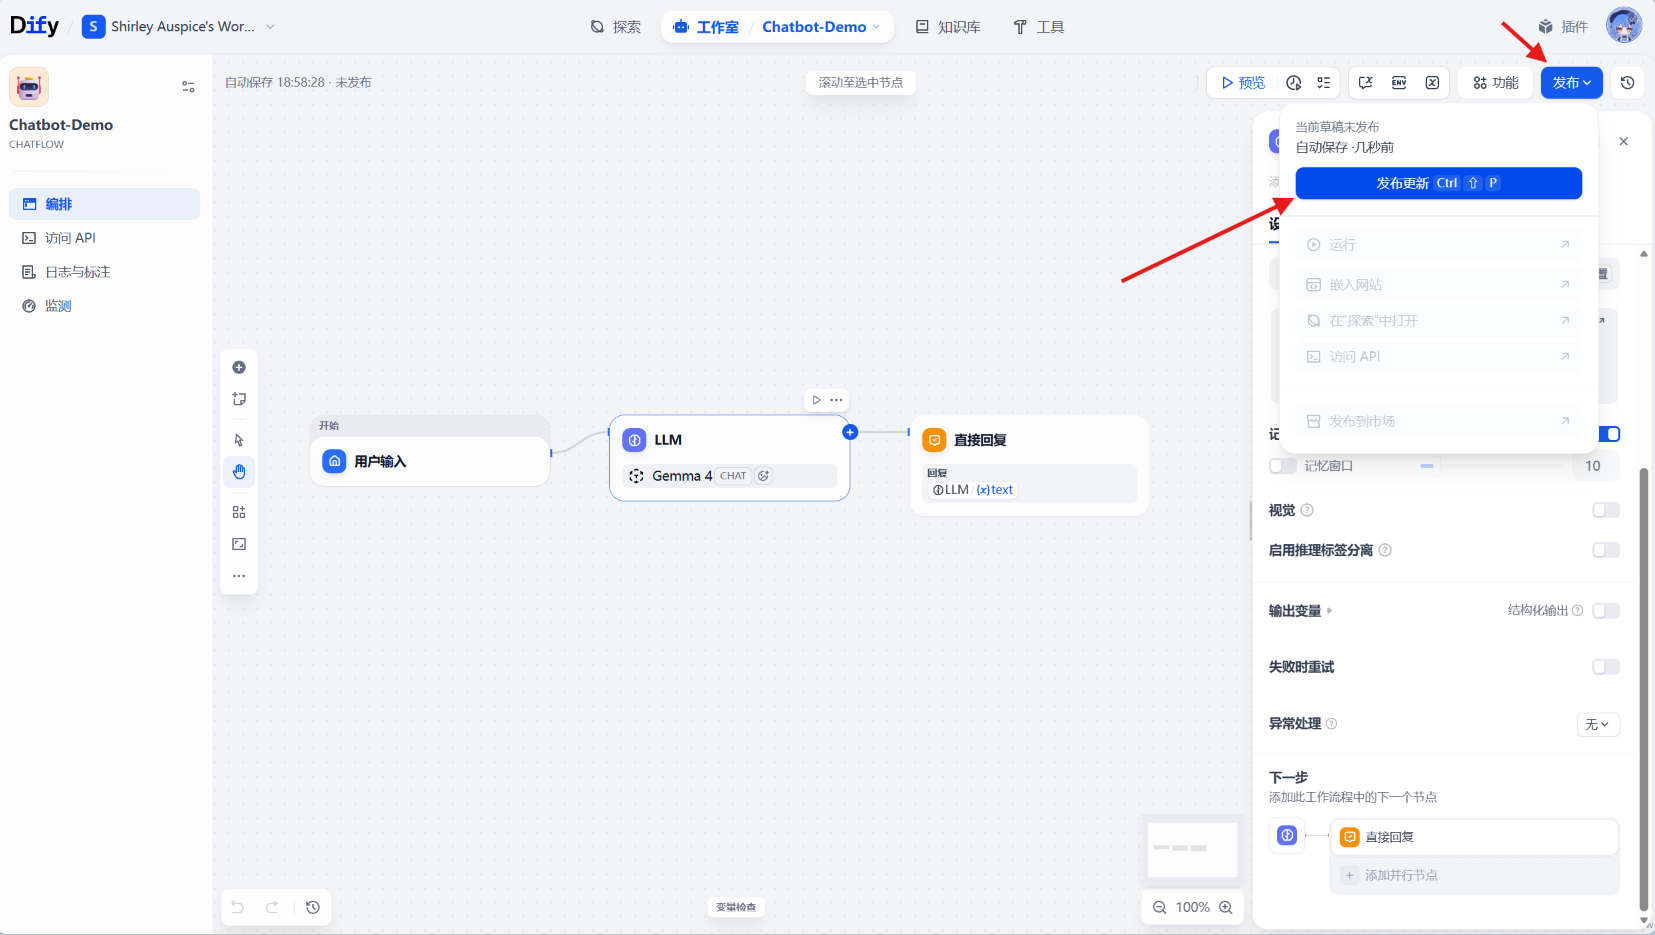
点击发布-发布更新:
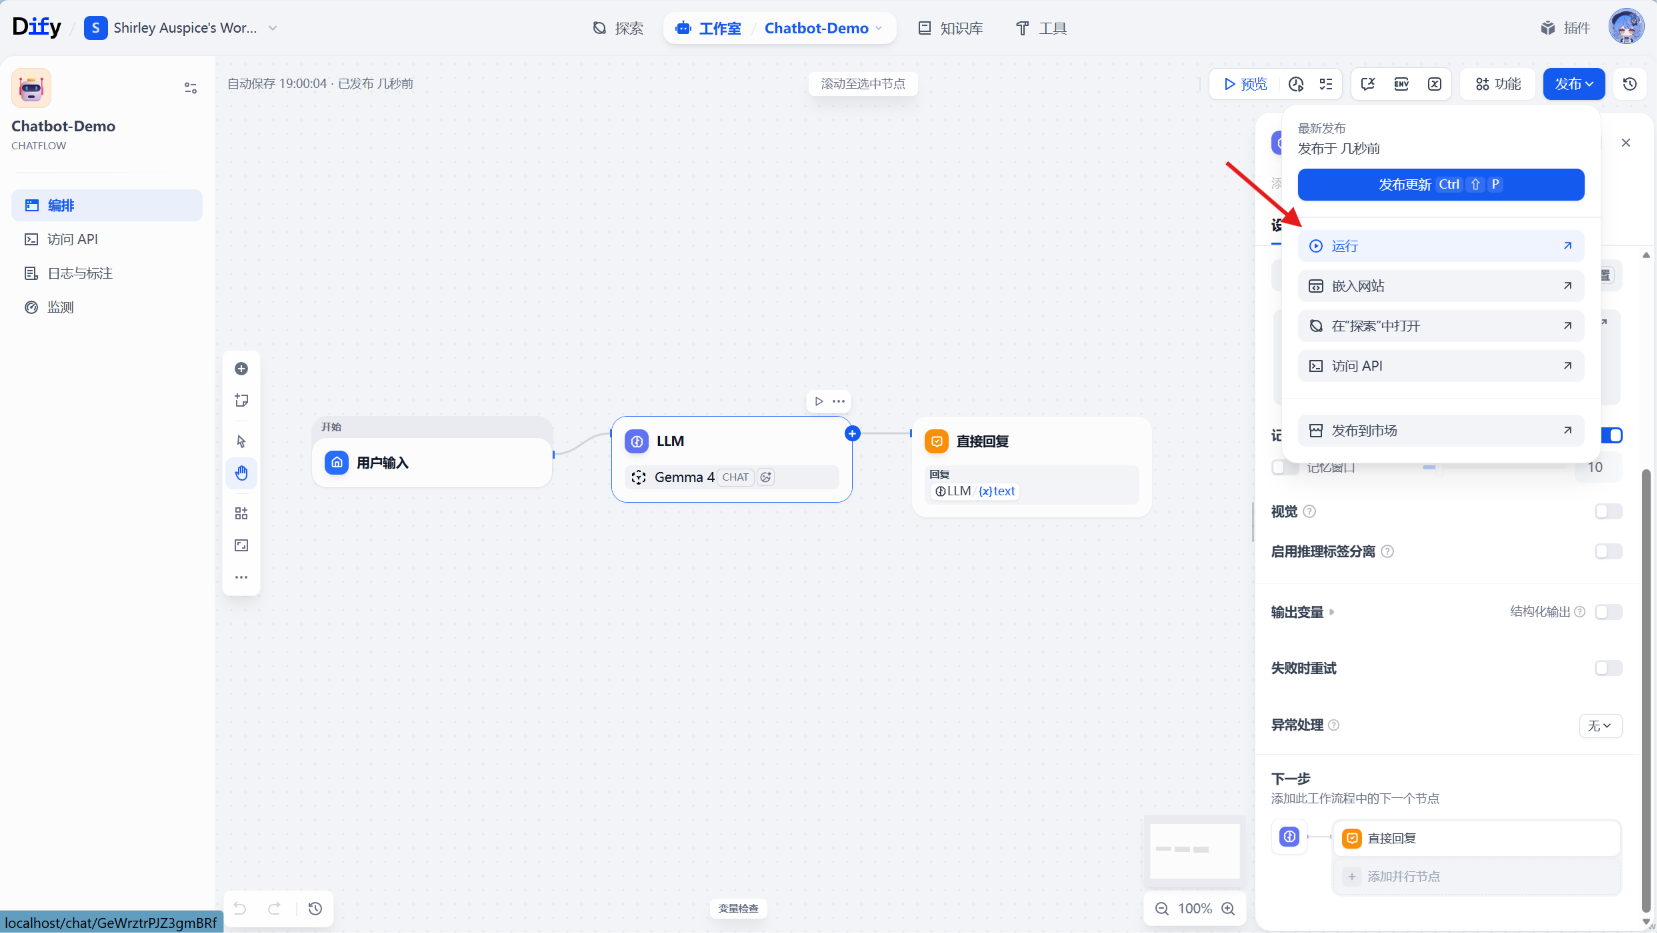
运行,这回在浏览器里打开一个新的窗口:
效果展示
测试一下,效果不错,哈哈😏
尾声
当然,上面我们展示的只是Dify最最最简单简单的用法,由于Dify使用工作流模式,这使得Dify拥有无限可能(就像Comfy UI那样),后面的进阶使用方法还请各位自行探索了,哈哈🥰
🤔为什么我不直接使用
NVIDIA NIM插件?
因为我没有在这个插件里面找到添加
API Key的选项🤣
如何压缩虚拟 Docker 的硬盘映像文件🤔NOTEWindows 的 Docker Desktop 基于 WSL2 来运行,所有的 Image、Container 数据都会被放到 WSL2 的虚拟磁盘文件(vhdx)中。而 WSL2 的 vhdx 具有“动态”特性,即当磁盘文件创建时,初始化一个最大的上限容量(默认是 1TB ),当里面数据增加时,vhdx 所占的空间随之增加,直到上限,但当里面的数据被移除时,vhdx 所占的空间并不会随之减小。这导致即使在 Docker 里删除了镜像文件,也无法即时释放磁盘的存储空间。
首先你需要关闭 WSL(如果你开启了 Docker Desktop,或者 Docker Desktop 关闭的时候卡住了,请重启电脑,记得关闭 Docker Desktop 的自启动)
PowerShell 以管理员身份运行终端:
PowerShell 类似输出:
PowerShell 输入并执行:
PowerShell 例如:
PowerShell 压缩磁盘(依次执行):
PowerShell PowerShell 若遇到报错:
PowerShell 则先分离磁盘文件:
PowerShell 再依次执行以下命令:
PowerShell PowerShell 就像这样:
PowerShell 最后你应该看到:
PowerShell 退出 DiskPart:
PowerShell PowerShell 大功告成:
PowerShell 此时你再去文件资源管理器里看看,你的磁盘空间应该得到了一定的释放